The Sub-Irrigated Planter Game Changer: Grow Plants With Less Effort
Imagine a garden where your plants consistently thrive, boasting lush foliage and abundant harvests, all without the daily chore of watering. Sounds like a dream, right? For years, avid gardeners, especially those battling scorching sun, drying winds, or limited time, have sought solutions to common container gardening frustrations. Enter the sub-irrigated planter (SIP) – a revolutionary system that has proven to be a true game changer, transforming thirsty plants into vigorous producers and turning daily watering into a distant memory. If you've ever found yourself longing for a more efficient, less labor-intensive way to grow your own food or beautify your space, learning
how to make a sub irrigated planter could be the most impactful gardening skill you acquire.
What is a Sub-Irrigated Planter (SIP) and Why Do You Need One?
At its core, a sub-irrigated planter is a self-watering container designed to deliver moisture directly to your plants' roots from below. Unlike traditional container gardens where water is applied from the top and drains through the soil, SIPs feature a built-in water reservoir at the bottom. This reservoir supplies water upwards into the growing medium through a process known as capillary action. Think of it like a sponge drawing water up – the soil acts as the wick, ensuring consistent moisture where plants need it most.
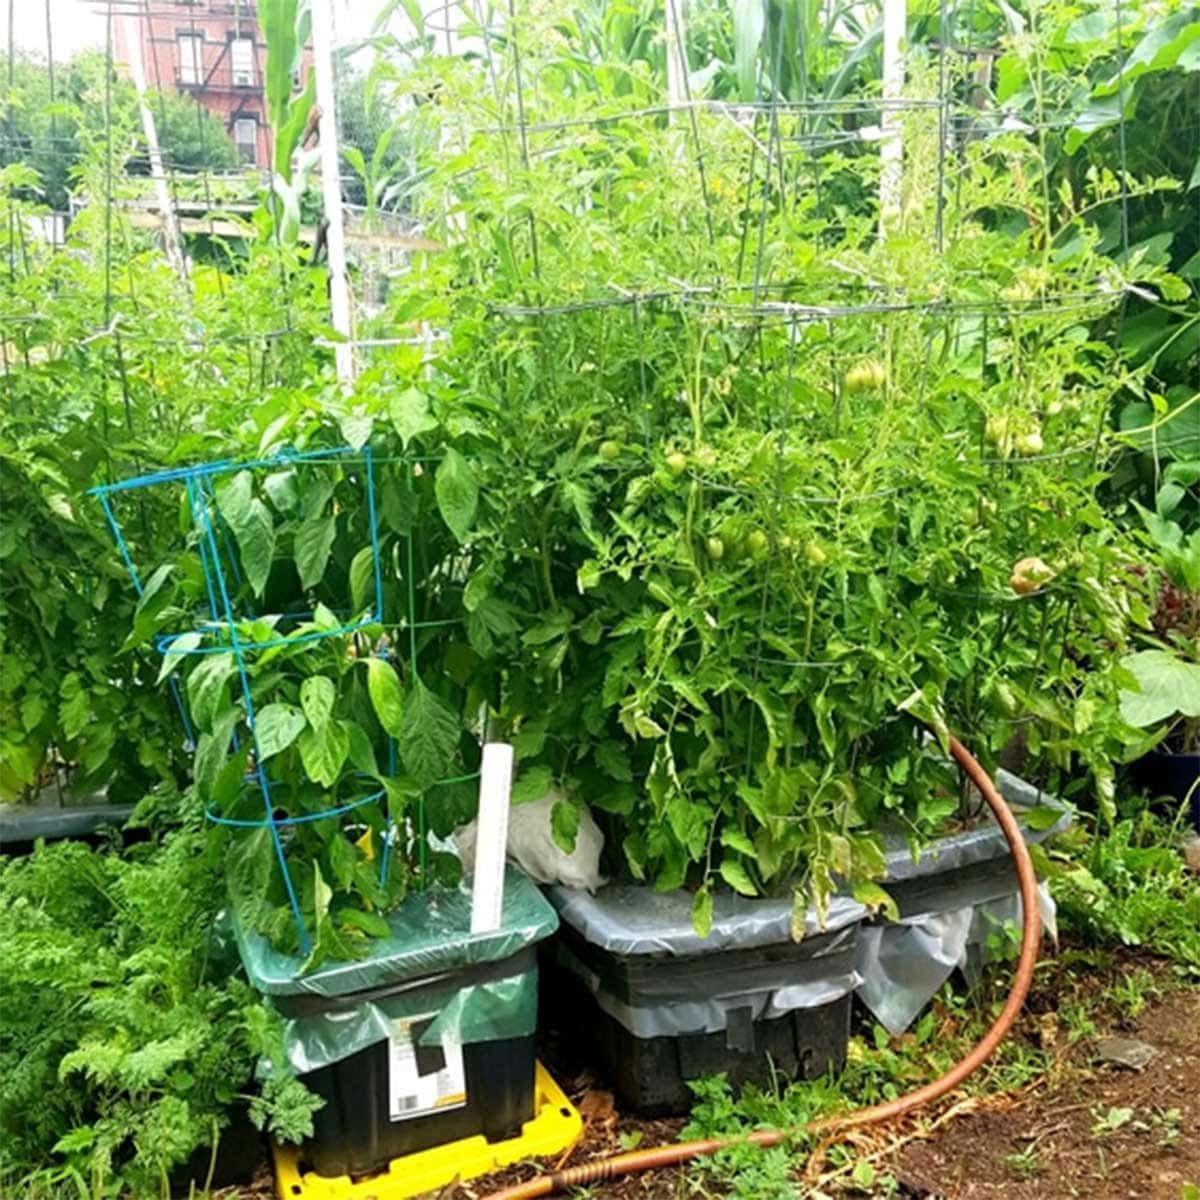
This ingenious method isn't just a clever trick; it's a fundamental shift in how plants access water, leading to a host of benefits. For gardeners grappling with the harsh realities of urban environments, like exposed rooftops or windy balconies, SIPs offer unparalleled resilience against rapid evaporation. One gardener, remembering their time cultivating hundreds of pounds of vegetables on a hot, windy NYC rooftop, vividly recalls how watering became a multi-hour daily task. The adoption of SIPs ended their "evaporation woes," freeing up countless hours and allowing their plants, including impressive 8-foot-tall tomato plants, to flourish and yield bountiful harvests.
While numerous pre-made SIP solutions are available for purchase, they can often be quite expensive, especially if you're aiming for a high level of production. This is where the DIY approach shines. Building your own SIPs not only offers significant cost savings but also allows for customization to fit your specific gardening needs and scale. It's an empowering way to reclaim control over your watering schedule and cultivate a thriving garden with less effort.
The Unbeatable Benefits of DIY Sub-Irrigated Planters
The allure of SIPs extends far beyond just making watering easier. They fundamentally improve plant health and gardener convenience in several profound ways:
*
Exceptional Water Efficiency: By delivering water from the bottom, SIPs dramatically reduce evaporation from the soil surface, meaning less water is lost to the air. This targeted delivery ensures every drop goes towards hydrating your plants, making them incredibly water-wise. This is particularly beneficial in hot climates or during dry spells, allowing you to conserve precious resources while keeping your garden hydrated.
*
Reduced Labor and Time Savings: The most immediate and appreciated benefit for most gardeners is the drastic reduction in watering frequency. Instead of daily watering, you might find yourself only needing to refill your SIP's reservoir once a week, or even less frequently, depending on the plant size and weather. This freedom from constant watering makes gardening more enjoyable and less of a chore, ideal for busy individuals or even for allowing you to take short vacations without worrying about wilting plants. If you're tired of hovering over a watering can, you'll love how SIPs help you
Stop Watering Daily: Build Cheap Sub-Irrigated Planters Today!
*
Healthier, More Vigorous Plants: Consistent moisture is crucial for plant health, and SIPs excel at providing it. They prevent the feast-or-famine cycle of watering that can stress plants, leading to stronger root systems and more robust growth. Plants in SIPs are less susceptible to common issues like blossom end rot in tomatoes (often linked to inconsistent watering) and can better absorb nutrients. This steady hydration encourages deeper root development, which in turn supports larger, more productive plants.
*
Optimal Nutrient Delivery: In traditional containers, nutrients can leach out with excess top watering. With SIPs, nutrients tend to stay within the root zone, making them more available to the plants. Many gardeners incorporate a slow-release fertilizer into the initial potting mix, which then slowly becomes available as the roots absorb water.
*
Cost-Effectiveness and Sustainability: Building your own SIPs from readily available and affordable materials, like durable storage totes, is significantly cheaper than buying commercial versions. This makes high-yield container gardening accessible to everyone. Furthermore, by reusing containers and conserving water, you're embracing a more sustainable gardening practice. For a comprehensive look at maximizing your yields, explore our
DIY Sub-Irrigated Planter: Easy Guide for Bigger Harvests.
*
Versatility for Any Space: Whether you have a sprawling backyard, a compact balcony, a sunny windowsill, or even an indoor grow tent, SIPs can be adapted. They are perfect for growing a wide variety of plants, from heavy feeders like tomatoes, peppers, and leafy greens, to herbs and even ornamental flowers.
How to Make a Sub Irrigated Planter: Your Step-by-Step DIY Guide
Ready to dive in and transform your gardening experience? Building your own sub-irrigated planter is a straightforward process that requires only a few basic materials and tools. While there are many variations, this guide will walk you through a popular and effective method, inspired by successful designs like Earthtainers and Global Buckets.
Recommended Supply List:
*
A Durable Container: We recommend 27-gallon HDX totes from hardware stores like Home Depot. They are inexpensive (around $12) and built to withstand the elements for multiple seasons. Avoid cheap, flimsy plastic containers, as they often crack and degrade quickly, especially when exposed to sun and temperature fluctuations. Investing a few extra dollars here pays off in longevity.
*
24″ 2″ PVC Pipe: This pipe serves as your watering tube. A 24-inch length is ideal for standard-height totes, and a 2-inch width makes it easy to insert a hose for filling. You can buy pre-cut sections or a longer 10-foot pipe for multiple SIPs (more economical).
*
7mil Plastic Sheet: This sturdy plastic will be used to create your false bottom, separating the water reservoir from the growing medium. You can also use other rigid, food-safe plastic materials or even a smaller, perforated bucket for this purpose.
*
Potting Mix (NOT Potting Soil or Garden Soil!): This is perhaps the most critical component. For the capillary action to work effectively, you *must* use a high-quality potting mix that is light, airy, and designed for container gardening. Potting soils or garden soils are too dense and will impede proper wicking. Look for mixes rich in peat, coco coir, or perlite.
*
Vegetable Fertilizer: An all-purpose vegetable fertilizer with an N-P-K (Nitrogen-Phosphorus-Potassium) ratio generally *lower* than 10-10-10 is recommended, as higher concentrations can burn your plants in a self-watering system.
*
Hand Saw: For cutting the PVC pipe to size if needed, and potentially for modifying the plastic sheet.
*
Drill with large bit (e.g., 1/2 inch or larger): For creating overflow holes.
Construction Steps:
1.
Prepare Your Container: Start by drilling several overflow holes along the side of your main tote, approximately 4-6 inches from the bottom. These holes are crucial; they prevent overfilling the reservoir and ensure your plants don't drown during heavy rains. The water level in your reservoir will never rise above these holes.
2.
Create the Water Reservoir Partition (False Bottom): Using your 7mil plastic sheet (or a pre-perforated piece of plastic or even the inverted lid of a smaller tote), create a sturdy "false bottom" that fits snugly inside your main container, resting just above the overflow holes. This partition will separate the water reservoir below from the potting mix above. Ensure it's strong enough to support the weight of the soil and plants.
3.
Establish the Wicking System: The false bottom needs openings that allow the potting mix to draw water up.
*
Method A (Wicking Cups/Baskets): Cut several large holes (e.g., 4-6 inches in diameter) into your false bottom. Place smaller, perforated containers (like old nursery pots or plastic cups with numerous holes drilled into them) through these openings, extending down into the water reservoir. These will be filled with potting mix to act as wicks.
*
Method B (Direct Contact): Alternatively, if your false bottom is robust and can support the soil directly, you can simply drill numerous smaller holes (e.g., 1-inch diameter) across its surface. The potting mix will then directly contact the water through these holes to wick moisture upwards.
* *Expert Tip:* Ensure good contact between the wicking material (potting mix in the cups/holes) and the water reservoir for optimal capillary action.
4.
Install the Fill Pipe: Cut a hole in your false bottom (or place the pipe within one of your wicking cups) that fits your 2-inch PVC pipe. Insert the PVC pipe vertically, so it rests on the true bottom of the tote and extends above the intended soil line. This is your access point for refilling the water reservoir.
5.
Add Your Growing Medium: Carefully fill your wicking cups or directly add your chosen potting mix onto the false bottom, filling the entire container to within a few inches of the rim. Gently pat it down, especially around the wicking areas, but avoid compacting it too much, as this can hinder aeration and drainage.
6.
Incorporate Fertilizer: At this stage, mix in your chosen vegetable fertilizer according to product instructions. Since nutrients are less likely to leach out of SIPs, you generally need less fertilizer than with traditional containers.
7.
Plant Your Garden: Create holes for your plants and carefully transplant them into the potting mix.
8.
Initial Top Watering: For the first few days after planting, water your plants from the top, just like you would a traditional container garden. This helps settle the potting mix, establishes initial moisture throughout the soil, and ensures the capillary action gets started effectively.
9.
Fill the Reservoir: After a few initial top waterings, begin filling the water reservoir through the PVC pipe. Fill it until water starts to trickle out of the overflow holes you drilled earlier.
Maximizing Your SIP Success: Tips and Tricks
To truly harness the power of your DIY sub-irrigated planter, consider these additional tips:
*
Choose the Right Potting Mix – No Compromises: Reiterate that using garden soil or heavy potting soil will lead to failure. The success of a SIP hinges on a light, airy, and absorbent potting mix.
*
Monitor Water Levels: Initially, check your reservoir every couple of days. You’ll quickly get a feel for how often your plants consume water. A good indicator is when the top layer of soil begins to feel dry to the touch, or if the tote feels significantly lighter.
*
Strategic Fertilization: SIPs retain nutrients efficiently. Consider using a controlled-release granular fertilizer mixed into the potting mix at the beginning of the season. For heavy feeders, you can occasionally add a liquid fertilizer directly into the water reservoir, allowing it to wick up with the water.
*
Optimal Plant Selection: Heavy-feeding, water-loving plants like tomatoes, peppers, eggplants, squash, cucumbers, and leafy greens (lettuce, spinach, kale) absolutely thrive in SIPs. Herbs also do exceptionally well.
*
Seasonal Maintenance: At the end of the growing season, remove spent plants and refresh your potting mix. While you don't need to replace all the mix, amending it with fresh compost and nutrients will keep your SIP productive year after year. Inspect the container for any damage and clean out the reservoir.
*
Experiment and Adapt: The beauty of DIY is flexibility. Don't hesitate to experiment with different reservoir materials, wicking methods, or even container sizes once you're comfortable with the basics.
Embracing the sub-irrigated planter system is more than just a gardening technique; it's a lifestyle upgrade for anyone who loves plants but struggles with the demands of traditional watering. By understanding
how to make a sub irrigated planter, you unlock a world of effortless abundance, allowing you to enjoy your garden's bounty without the constant worry of thirsty plants. Say goodbye to daily watering woes and hello to a thriving, low-maintenance garden!